
This plug-in filter is used for descreening images that have been scanned from a previously printed source (such as a newspaper, magazine, book, postcard, etc). It can also be used for descreening halftone films. Descreening prevents moiré patterns, and consists of two operations:
After the installation, the Descreen filter will available as Sattva > Descreen from the Filter menu.
Examples in this section show how to use the plug-in. Download DescreenSamples.zip for the sample images.
Picture 1. The plug-in dialog (Mac OS version). The legends on untitled buttons wil be displayed when the mouse moves over them on the program itself.
Open Finland.jpg in Photoshop. Launch Descreen (choose Sattva > Descreen from the Filter menu). The plug-in dialog box will appear. Select Automatic. Click OK. This is the simplest way to use the plug-in. When put into the Automatic mode, the plug-in will automatically calculate all the settings. However, the Automatic mode does not produce the best possible results for colour images. In conclusion, close the file without saving.
Open Milla.jpg. Launch Descreen. Deselect Automatic. Change the preview area so that it is filled with the image rather than with the text. Click the Screen Measure button near the Screen slider to perform a calculation of the screen frequency. The plug-in will calculate the screen frequency and the screen angles over the part of the image shown in the Preview window. Click OK. Close the file without saving.
Open Gerard.jpg. Launch Descreen. Select Noise reduction.
Set
Original = 50,
Edges = 50,
Hi = 50,
Middle = 50,
Low = 50,
Outlines = 50,
Emphasis = 0 (try
also Emphasis = 15 to restore the dynamic contrast).
Click OK. Close the file without saving.
Scan a small colour image (about 1 x 1 inches) at 600-1200 pixels/inch. It is important to use the scan resolution from the scanner presets value. If your scanner has Descreen or Sharpen options, disable them. The image should be scanned without scaling (i.e. 100% scaling). If you save the scanned image before descreening, use the TIFF or PNG format rather than JPEG. If using JPEG, choose the best quality setting or minimal compression.
Open the scanned image in Photoshop. Launch Descreen. Select Reduce Moiré. If the image was scanned properly and has a distinct screen, the plug-in will calculate screen frequency and screen angles of the image. If the plug-in fails to calculate screen frequency, change the Preview area and click the Screen Measure button. If the plug-in fails to calculate screen angles, change the Preview area and click the Screen Angles Measure button. Screen frequency should be measured first, then the screen angles. If screen angles or screen frequency are not specified, the OK button remains unavailable.
If you fail to filter the image, try to use the Automatic mode (see Example 1) or scan another image. If the filter still does not work, the most probable reason is that the image was incorrectly scanned. See How to Scan Printed Originals.
You can further explore the plug-in empirically. If you will need more information please read the rest of the User Guide. Key terms such as screen, colour printing and halftone moiré pattern are given in the Glossary.
Descreening consists of two operations: 1) Screen removing; 2) Reducing the halftone moiré pattern (in printed colour images). Printed images must be properly scanned, as explained in How to Scan Printed Originals, for descreening to be successful.
Along with descreening the third operation may be useful — noise reduction.
To remove the screen, you have to specify screen frequency on the Screen slider (see Picture 1). An example of screen removal is shown in Picture 2. Usually, the plug-in calculates screen frequency automatically, but if an image has no distinct screen, it fails to do so. You may specify the screen frequency manually by the Screen slider. If you enter a screen frequency that is higher than its actual value, the screen will be reduced but not removed completely; if lower, the image will lose sharpness.
Picture 2. Screen removing for
a greyscale image
Left: the scanned image (included in DescreenSamples.zip).
Right: the filtered image.
The screen removing controls are described in Controls.
When descreening colour printed images, you need to perform an additional operation — reducing the halftone moiré pattern. See Picture 3.
Picture 3. Reducing the
halftone moiré pattern for a colour image.
1) The original image (included in DescreenSamples.zip).
2) The same image after screen removal. There is still a prominent halftone
moiré pattern.
3) The same image after screen removal and reduced moiré.
4) The same image after screen removal, and reduced moiré and noise.
To reduce the moiré, select Reduce Moiré and enter screen angles for Cyan (C), Magenta (M), Black (K) and Yellow (Y) inks (see Picture 1). With the screen angles entered, the plug-in reduces the moiré. If you enter either a wrong screen frequency or wrong screen angles, the plug-in will fail to reduce moiré, and it may actually produce extra moiré. For properly scanned images, the plug-in calculates screen angles automatically. If it fails to do so, you have to enter them manually.
The moiré and noise reduction controls are described in Controls.
For more information about the screen and descreening process, see the Glossary.
The controls of the plug-in are divided into three groups (see Picture 1) in accordance with the three operations described above: the screen removing, the moire reduction and the noise reduction. If current settings are inappropriate to descreen the image, the OK button will be disabled.
This slider should be set to the exact screen frequency of the image. If the screen frequency is not specified, the OK button will be disabled.
After you launch the plug-in, it calculates screen frequency over the part of the image shown in Preview. If successful, the Screen slider is set to this screen frequency. If the plug-in fails to determine frequency, choose a part of the image with a more prominent screen in Preview. Click the Screen Measure button to measure screen frequency. This button is to the right of the Screen slider (see Picture 1). Alternatively, you can also measure screen frequency using the Measure Tool.
If you fail to measure screen frequency, make sure you have properly scanned the image (see How to Scan Printed Originals).
When you enter screen frequency with the help of the Screen slider, the hand will appear on the Screen Measure button. It is a reminder that you have entered screen frequency manually.
When the plug-in is detecting screen frequency, it searches within the Expected screen range. If processing a batch of images from one source, it is recommended that the Expected screen range is set to a narrow one. For example, if the images are 175 lines/inch, set the expected screen range to 160...190. The plug-in will then only search within this narrow range. The works of the plug-in become steadier, and there will be fewer error alerts.
The Sharpness slider compensates for the blurring that occurred during the scanning. Sometimes it may be useful to reduce sharpness to make the ragged edges in the image less prominent.
Select Reduce Moiré if you are going to reduce a halftone moiré pattern. This option is enabled for RGB images only. The moire reduction will not work after the screen has been removed.
The Screen Angles boxes should correspond with the screen angles of the image to be processed. The plug-in calculates the screen angles over the part of the image shown in Preview and fills-in Screen Angles boxes; otherwise they remain empty. You can use the Screen Angles Measure button (on the right of the Screen Angles boxes, see Picture 1) to measure the screen angles over the part of the image seen in Preview. Alternatively, you can measure the screen angles using the Measure Tool.
If the plug-in has detected CMK angles, however has not detected Yellow angle, you can set it manually. Click the B button under the Preview window to see Blue channel. Click on the small arrow button near the Y field. Choose Yellow angle at which moiré reduction in Blue channel will be the best. If you will not specify Yellow angle, the halftone moiré pattern in Blue channel will not be reduced.
The colours of the CMKY letters over the Screen Angles fields correspond to the way these angles have been entered (see Picture 1). If a screen angle has been measured by the plug-in, its letter is black. If a screen angle has been entered by the user or calculated by the plug-in based on other measured angles, its letter is grey. The angle between CMK inks is usually 30 or 60 degrees. Therefore, if the plug-in has measured at least one of the angles, it can calculate the other two by adding 30 and 60 degrees.
To reduce the halftone moiré pattern, at least two angles of CMYK must be specified. Otherwise the OK button will be disabled.
The Sensitivity slider is used to set the sensitivity of the moiré reducing algorithm. To find the best value of this control, set the Sensitivity slider to the extreme left, which corresponds to the lowest sensitivity. Then move gradually the slider to the right until the halftone printed moiré starts being reduced. At some point there will be no further improvement. This is the optimal position. Choosing a higher value will not improve the result, but increase the probability of the false moiré. If the false moiré appears, move the Sensitivity slider to the left until the false moiré disappears.
The default value of Variant is 0. This is appropriate to the most of images. In some cases the Sensitivity slider gives no improvements to overcome a moire. Then you may try the Variant control. The more value of Variant is the more aggressive method of moire reduction is used. Variant = 1 and Variant = 2 provide more intense moire removing in flat areas. Variant = 2 may produce the halo around edges. Variant = 3 gives the total moire removing. You may multiplicate the same image to different layers, descreen them at different Variant values and combine the results choosing the better areas from the each layer. That is the masking technique. Variant = 2 and Variant = 3 are intended for the masking technique.
Select Noise reduction to reduce grain in the image and to restore the dynamic contrast.
The denoised image is mixed with the unfiltered one to preserve the details of the original.
Used to preserve edges of the original.
Click the button on right of the Hi slider. Move the Hi slider to hide all noise in the hi frequency range. Don't worry about lost of details.
Click the button on right of the Middle slider. Move the Middle slider to hide some noise in the middle frequency range. Preserve most of details in this range.
Click the button on right of the Low slider. Move the Low slider to reveal all countours and hide some noise in flat areas.
Click the button on right of the Hi slider. The more Outlines value, the more an image will be smoothed along the image lines.
This control changes the dynamic contrast of the filtered image.
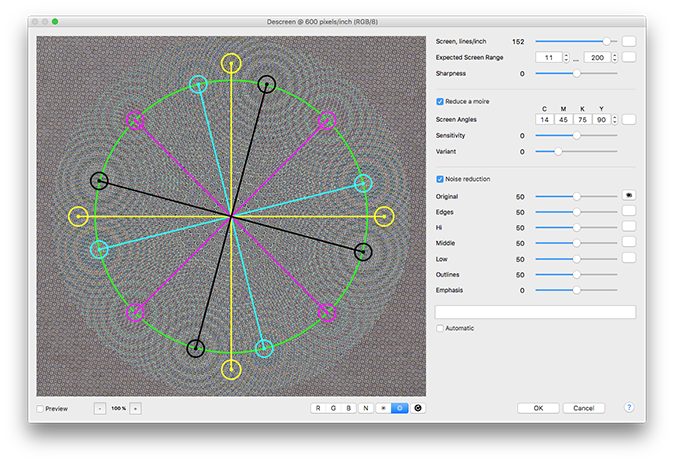
Click on the right measure button ![]() . For images scanned at 600 dpi set 100 % preview zoom, at 1200 dpi — 50 %, at 2400 dpi — 25 %.
. For images scanned at 600 dpi set 100 % preview zoom, at 1200 dpi — 50 %, at 2400 dpi — 25 %.
To measure the screen frequency place the green circumference over the centers of the interference rings using the Screen slider.
To measure the screen angles place the angle lines over the centers of the interference rings by changing the angle values. The Cyan ink is more prominent in the Red channel, the Magenta — in the Green, the Yellow — in the Blue. The yellow screen frequency is often a bit differing from other. That is normal.
It is possible that during moiré reducing the moiré pattern becomes more prominent. This phenomenon is called "false moiré" in this guide. The false moiré usually appears near "problem areas" such as sharp details of the image or lines parallel to screen lines. An example of a "problem area" is text placed over a photograph. To eliminate the false moiré, reduce the Sensitivity. Also you can try the Variant control.
The work of the plug-in is based on analyzing the smallest details of an image. It is important to scan printed originals properly if scanned images are to be descreened successfully.
First of all, the scan resolution must be high enough. For the most images scan resolutions within 600...1200 pixels/inch should be sufficient. Scanning at resolutions of more than 1200 pixels/inch seldom leads to better results compared to scanning at 600 pixels/inch, however it greatly increase processing time.
| Printed originals | Typical screen frequency | Recommended scan resolution |
| Street posters | 35...75 lines/inch | 300...600 pixels/inch |
| Newspaper (vintage) | 35...100 lines/inch | 300...600 pixels/inch |
| Newspaper | 75...150 lines/inch | 600...1200 pixels/inch |
| Books and magazines | 100...175 lines/inch | 600...1200 pixels/inch |
| Postcards, art books, high quality publicity materials | 150...250 lines/inch | 600...1200 pixels/inch |
| Postage stamps, bank-notes | more than 300 lines/inch | 1200...2400 pixels/inch |
The scan resolution measured in pixels/inch must be at least 3 times more than the image screen frequency measured in lines/inch. If the image resolution is less than 3 times its screen frequency, the image needs to be rescanned. For example, if the scan resolution is 300 pixels/inch, the plug-in can descreen colour images, if their screen frequencies are less or equal 100 lines/inch. It follows that a scan resolution of 300 pixels/inch is too low for the most colour images.
Some printed originals, such as images printed by a new offset press on a high quality coated paper or films, have very sharp spots of their screen. During scanning this kind of printed images the moiré is likely to arise. This is due to the interference between the screen spot edges and the CCD pixels. The examples of the real screen spots are shown in Picture 4. To prevent the moiré during scanning this type of images, scan them at the scanner's optical resolution. After that use the plug-in Downsample to downsample the image resolution to 600...1200 dpi. For example, if the optical resolution of the scanner is 2400 pixels/inch and a screen frequency of the original is 150 lines/inch, downsample it to 600 pixels/inch. If screen frequency of the original is 175 lines/inch, then downsample it to 800 pixels/inch. Don't use Photoshop's Image Size command for this purpose because it may produce the moiré during downsampling.
There are four factors that affect the quality of descreening:
The first two factors are discussed in this section (the last two were discussed above).
Low quality printed originals are for example newspapers printed on uncoated paper. After descreening these images, one can see maculation, grain and poor contrast especially in shadows and highlights. The maculation and the grain are due to heterogeneity of the uncoated paper. The poor contrast is due to its poor absorbability.
Picture 4. Screen spots
(enlarged 100:1).
1) In a file;
2) On a film (or plate);
3) After
printing on a coated paper;
4) After printing on an uncoated paper.
The higher the printing and paper quality, the sharper the screen spot edges and the higher the quality of the descreening. However, when the screen spot edges are very sharp special care must be taken when scanning — see Scanning High Quality Printed Originals.
It is important for moiré reduction that your scanner has enough resolving power. If the scanner has the resolving power less than 3 times the image screen frequency, the plug-in will fail to descreen the image. If the plug-in can't calculate screen frequency or the screen angles, it is likely either the scanner has poor resolving power or you have made wrong scanner settings. You may try to enter screen frequency and the screen angles manually and filter the image. However, the result may be far from ideal.
A good scanner should be able to scan an A4 original at 600 pixels/inch without any pause. If the scanner makes pauses during scanning, it slices the scanned image. The less precise the scanner's mechanism, the less the slicing accuracy. Seams and gaps affect the descreening quality. Sometimes it is possible to see the seams and gaps in Photoshop at 100% magnification. If it is the case, scan the images one by one instead of scanning many images for one big scan.
Most of fax-machines, copiers and multi-function devices do not provide good quality when they scan at 600 pixels/inch or more. They usually apply their own sharpen and descreen filters by default. This interferes with the Descreen plug-in.
If you have troubles with descreening, download properly scanned images from the plug-in site. Try to descreen these image to help localize the problem. Also you may scan the image using another scanner and compare the results.
This plug-in module has been installed along with the Descreen plug-in. It can be found under the Automation section of the File menu. The Downsample plug-in downsamples the image resolution without introducing any moiré.
By creating the Photoshop Action and using Photoshop Batch command you may process a folder of files. See help on Photoshop how to record Actions and use the Batch command.
When the plug-in is launched it determines the screen frequency to process the image. Depend on plug-in settings there are three ways to determine the screen frequency.
When processing a batch of images, it is recommended that the Expected Screen Range be narrowed to be 80% and 120% of the expected screen frequency. This makes the processing become steadier. If you are sure that all images in the batch have the same frequency, it is better to record an action with the frequency specified manually.
For color images CMYK angles are automatically measured, if the angles were not set manually when recording the Action. It is recommended to record Actions with fixed (i.e. manually set) angles only if all images belong to the same edition and were scanned at the same angle (± 1°).
When writing Actions, do not call the plugin via Ctrl+F (Cmd+F), because in this case the filtering parameters will not be recorded. To record, call the plugin via Filter > Sattva > Descreen.
To ensure that the processing process is not interrupted by error messages, use the option provided in Photoshop to write errors to a log file.
This can be done by converting the image to the CMYK mode and shifting the channels. It should be done after descreening.
There is no information lost if the resolution of a descreened image is reduced to up to 2 times screen frequency. You don't save more image details if you keep the descreened image at higher resolution. For example, if you have descreened an 800 pixels/inch image with 175 lines/inch screen, you can lower its resolution by the Image Size command to 350 pixels/inch. The image will lose no details.
Four colour offset printing — a way of full colour printing by four inks, whereby each ink is offset printed as a screen. The four inks are cyan, yellow, magenta and black (CMYK). Screen frequencies are usually the same for all inks. Screen angles are chosen to minimize the Halftone moiré.
Picture 5. Full colour printing using the four inks.
Halftone Moiré — a moiré formed during the colour offset printing between Cyan, Magenta, Yellow and Black ink screens. When the separation screens are correctly registered screen dots form rosettes (see Picture 3 and Picture 5). That is a halftone moiré. The most prominent halftone moirés in Red and Green channels are formed between dense inks: Cyan, Magenta and Black. The most prominent halftone moirés in Blue channel are formed between Yellow and dense inks. Reducing the halftone moiré is a part of the process of descreening for scanned colour printed images.
Halftoning — see Screening.
Moiré - an interference pattern created when two grids have slightly different mesh sizes, or when they are overlaid at an angle.


Picture 6. Moiré pattern examples.
Optical resolution of the scanner — the native resolution of the scanner determined by the number of its CCDs (sensors) per inch. At this resolution, scanner does not scale the image, and the scan quality is its best. Scanning at a higher resolution does not give more information; you can get the same result by scanning at optical resolution and upsampling the image by the Photoshop's Image Size command. The scanner's true resolving power is less than its optical resolution.
Offset printing is a widely used printing technique where the inked image is transferred (or "offset") first to a rubber blanket, then to the printing surface. The printed printing surface consists of ink-free areas and areas filled with the ink. There are no areas with midtones (shades). To reproduce the midtones in offset printing, the halftoning is employed. To learn more about offset printing see an article in Wikipedia.
Resolving power of the scanner is the minimum distance between distinguishable lines of the scanned object. The resolving power is measured by a special line target (test object) consisting of graduated convergent thin lines. The point where the lines of the scanned line target are merged determines the scanner's resolution power.
Screen — the result of the screening.
Screen angle — an angle of screen lines. For the colour offset printing setting the screens at maximally different angles ensures that the dots placed by the four screens blend to look like continuous colour and produce the minimum moiré pattern. The common screen angles are C105°, M75°, Y90°, K45°. The angle 105° is equivalent to 15° because the screen cells are square. The angle 90° is equivalent to 0°. So these angles are the same as C15°, M75°, Y0°, K45°.
Screen frequency — the number of lines of cells per inch (lines/inch) in a halftone screen. The higher screen frequency the finer image details can be printed, and the less halftone screen is visible to eye. However for high screen frequencies, high quality paper and inks are required. For the typical screen frequency values see the Scanning section.
Screen lines — screen cells, which osculate each other and are on the same line (see Picture 8).
Screen removing (the theory). Suppose that an offset printed image has been scanned as, for example, the left image in Picture 2. This image has a screen. Calculating the spectrum of this image, shows high peaks at the screen frequency and its harmonics (see Picture 7). If this image is output to a screen device (a printer, a display, an imagesetter) with a screen frequency close to one of these peaks, a moiré pattern will occur. To prevent the moiré, all these peaks should be eliminated. The Descreen plug-in removes from an image all frequencies equal to the screen frequency and higher. The result of the descreening is shown in the right part of Picture 2.
Picture 7. Spectrum of the image with a screen
a) The domain with image information.
b) The domain with screens peaks to be eliminated. The boundary of the
domains is a bit to the left from the image's screen frequency value.
Screening, or Halftoning — the simulation of a continuous-tone image (shaded drawing, photograph) with dots. A halftone screen used in the offset printing consists of square cells partly filled with ink. The cell size is 0.003-0.02 inches. When the black ink is used, partly filled cells take on shades of gray for human eyes (see Picture 8), because the cells are so small. Halftone screen attributes include screen frequency, screen angles and a dot shape. To learn more about halftoning see an article in Wikipedia.
Picture 8. The example of the screening (enlarged by 30 times): the upper image with 10%, 30%, 50% and 70% density, the lower image is the result of screening (round screen dots, screen angle 15 degrees). One of the screen lines is marked. Real screen spots are shown in Picture 4. colour screens are shown in Picture 5.
A good scanner with the optical resolution at least 600 dpi is required. Fax machines and multi-function devices usually do not provide good enough quality when scanning at 600 dpi or more.
See Help on activation the plug-in.
If you have troubles using the
plug-in, write to sattva![]() sattva
sattva![]() ru
ru
The plug-in site: http://www.descreen.net/eng/soft/descreen/descreen.htm
Download the recent plug-in version here.


.")
.")
.")
.")


